Top

Notice: The ThermoWorks BBQ app has been replaced by the new, completely redesigned ThermoWorks app. (The icon has a yellow background.) Click here to learn more about the new app.
Controlling your ThermoWorks connected thermometers is an elevated experience with the all-new ThermoWorks App and new ThermoWorks Cloud. The ThermoWorks App boasts powerful new features, a more intuitive interface, and more robust connectivity. Plus, now you can dive into your temperature data from any browser, explore and annotate graphs, and share everything with your team anytime, anywhere on the new ThermoWorks Cloud.
Download the new, free ThermoWorks app from either the iTunes App Store or the Google Play Store. Open the app on your smart device to begin.
Learn more about the ThermoWorks app here.
Learn more about ThermoWorks Cloud here.
This help file contains instructions for the topics ThermoWorks BBQ app below.
Before You Start
Adding Your Device
- Setting Up BlueDOT
- Setting Up Signals
- Setting Up Smoke Gateway (iOS)
- Setting Up Smoke Gateway (Android)
- Using Billows with Signals
Using the ThermoWorks BBQ App
- Device Options (Adding, removing, renaming devices, and more.)
- Home Screen (Manage connected probes.)
- Probe Alarms
- Renaming Probes
- Change Device from Fahrenheit to Celsius
- Important to Know About Graphs
- Saving and Exporting Single and Multi-Probe Graphs
- Accessing and Using Saved Graphs in ThermoWorks BBQ App
- Profile
- Troubleshooting
- Firmware Updates
- Chef-Recommended Temperatures
A
ThermoWorks BBQ App Installation
Download the free ThermoWorks BBQ app from either the iTunes App Store or the Google Play Store. Open the app on your smartphone or tablet to begin.
When you begin using the ThermoWorks BBQ app, you will be prompted to choose an account login and a password.
If you are using the ThermoWorks BBQ app with Smoke Gateway or Signals, you may remotely save graphs to the cloud from your last cooks (you may save 5 Smoke graphs and 10 Signals graphs) which you can access from any logged-in device.
If you are using the ThermoWorks BBQ app with BlueDOT, your login will allow the app to know where to save graphs to your phone or tablet. You may save 10 BlueDOT graphs while you are logged into your account. Once you log out of your ThermoWorks BBQ account, all BlueDOT graphs are removed from your phone or tablet. If you wish to permanently save your BlueDOT graphs, you must export them to a .csv file before you log out of the ThermoWorks BBQ app.
Note: Your ThermoWorks BBQ app account is not connected to your ThermoWorks store account.
Back to Top
B
Important to Know
How Many Devices May Connect to the ThermoWorks BBQ App at Once?
- ThermoWorks BBQ app is used with BlueDOT, Signals, and Smoke Gateway and can be used with all three types of thermometers at once.
- *Typically, your phone or tablet can support up to 6 Bluetooth-connected devices at the same time. (BlueDOT and Signals)
- You may track an unlimited number of Smoke Gateways at the same time.
- You may track an unlimited number of Smoke Gateways while tracking up to *6 Bluetooth connected devices (BlueDOT and Signals).
- If using a Wi-Fi connection with Signals, you may track an unlimited number of Signals at once.
- If using a Wi-Fi connection with Signals, you may track an unlimited number of Signals, Smoke Gateways, and up to *6 BlueDOTs at the same time.
Type of Connection and Range Limits
Signals, and Smoke Gateway use a 2.4GHz network.
Smoke will communicate with Smoke Gateway up to 300 feet line-of-sight.
Signals and BlueDOT will communicate via Bluetooth up to 95-feet line-of-sight, unless other factors are involved.
- Devices that use 2.4GHz radio frequencies (microwave ovens, cordless phones, remote controls, etc.) may create interference.
- The signal may be interrupted by walls and building materials, such as tinting on windows.
Signals or Smoke + Smoke Gateway will stay connected anywhere in the world with your phone or tablet through the cloud as long as the following is true:
- Signals and Smoke + Smoke Gateway have been setup on a 2.4GHz Wi-Fi network with an internet connection.
- Your phone or tablet has an internet connection to receive the data (Wi-Fi or cellular).
Communication Between the ThermoWorks BBQ App and Devices
BlueDOT and Signals include two-way communication, meaning that changes made in the ThermoWorks BBQ app are reflected on the hardware and changes made on the hardware are reflected in the app. (Changes will reflect between the two based on the interval rate that is set in the app.)
There is one-way communication between Smoke Gateway and the ThermoWorks BBQ app, meaning that the app receives temperature data from Smoke via Smoke Gateway, allowing you to track the cook remotely; you cannot change the settings of Smoke’s hardware from within the ThermoWorks BBQ app. Your phone or tablet will alert you when the probe temperature limits you have set in the app have been reached.
Hardware Troubleshooting Help Articles
Answers to common device hardware troubleshooting questions may be found here:
Back to Top
C
Setting Up BlueDOT
Before you begin, make sure that…
- You have installed the latest version of the ThermoWorks BBQ app on your phone or tablet.
- Bluetooth is enabled on your phone or tablet.
- Your phone or tablet is within range of your BlueDOT, which is 95 feet or less, depending on obstructions between your phone or tablet and BlueDOT.
Set Up BlueDOT in the ThermoWorks BBQ App
- Power on BlueDOT.
- From the Menu, choose Devices.
- Click on the Add Device button.
- Select BlueDOT from the popup menu.
- A list of BlueDOTs located in the immediate area will appear, identified by their serial numbers. Choose the BlueDOT you wish to connect to.
- Once connected, your BlueDOT is ready to use with your phone or tablet.
Troubleshooting: BlueDOT Help File
Back to Top
D
Setting Up Signals
Before you begin, make sure that…
- You have installed the latest version of the ThermoWorks BBQ app on your phone or tablet.
- Bluetooth is enabled on your phone or tablet.
- Location Services is enabled (found in your phone or tablet’s settings).
- Your phone or tablet is within range of Signals, which is 95 feet or less, depending on obstructions between your phone or tablet and Signals.
- If connecting to Wi-Fi, Signals is close enough to the Wi-Fi router to get a strong connection.
- You know your secure 2.4GHz Wi-Fi network’s name and password, including the correct letter case and punctuation. You may use Signals with an open network, as long as the network does not require a password.
- The network password is 30 characters or less, if required.
- The network security type is WPA/WPA2 or open.
Set Up Signals in the ThermoWorks BBQ App
- Power on Signals.
- From the Menu, choose Devices.
- Click on the Add Device button.
- Select Signals from the popup menu.
- A list of Signals located in the immediate area will appear, identified by their serial numbers. Choose the Signals you wish to connect to.
- After a Bluetooth connection is established, the app will automatically open the Network Setup screen. Enter your Wi-Fi network’s name and password, taking care to use the correct punctuation and case. To use as a Bluetooth connected device (or if no Wi-Fi network is available), select Exit.
- Signals is ready to use with your phone or tablet.
Important: You will establish Signals’ Bluetooth connection in the ThermoWorks BBQ App, not in your phone’s Bluetooth settings dialogue.
Troubleshooting: Signals Help File
Back to Top
E1
Setting Up Smoke Gateway (iOS)
Before you begin, make sure that…
- Your Smoke Gateway is fully charged.
- You have installed the latest version of the ThermoWorks BBQ app on your phone or tablet.
- Your Smoke Gateway is within 300 feet line-of-sight of your Smoke (depending on obstructions between Smoke and Smoke Gateway) and close enough to your Wi-Fi router to get a strong connection.
- You know your secure 2.4GHz Wi-Fi network’s name and password, including the correct letter case and punctuation. You may use Smoke Gateway with an open network, as long as the network does not require a password.
- The network password is 27 characters or less, if required.
- The network security type is WPA/WPA2 or open.
Note: If you purchased your Smoke Gateway prior to 8/8/2018, you may need to update Smoke Gateway’s firmware (if you already haven’t) before beginning the setup process. Instructions for updating the firmware are found here.
(1) In the ThermoWorks BBQ App
- From the Menu, choose Devices.
- Click on the Add Device button.
- Select Smoke Gateway from the popup menu.
(2) Sync Smoke and Smoke Gateway
- Hold down Smoke Gateway’s Power button. You will see two blue flashes, indicating that Smoke Gateway has turned on. Continue holding down the Power button until you see a flashing red light. The red light will continue to flash throughout the sync process.
- Power on Smoke.
- Hold down the Sync button (((•))) (located on the back of Smoke) until the Sync message appears on Smoke’s display.
- Smoke Gateway will display a solid red light, indicating that the sync is complete. After a brief delay, a purple light will begin to flash.
(3) In the ThermoWorks BBQ App
- Click on the Settings button.
- From your device’s Settings menu, choose the Wi-Fi setup option.
- Choose your Smoke Gateway’s network from the list of available networks. The network name will start with “Gateway.” (Example: Gateway_XXXXXX)
- Using your phone or tablet’s back button (located at the top left-hand corner of the window), return to the ThermoWorks BBQ app.
- Click on the Next button.
- Enter the 2.4GHz Wi-Fi network’s name and password, including the correct letter case and punctuation.
- Once the network connection is made, Smoke Gateway is ready to use with your phone or tablet.
Note: If you are interrupted during the setup process and find that you cannot continue through the steps, begin the setup process again.
Troubleshooting: Smoke Gateway Help File
Back to Top
E2
Setting Up Smoke Gateway (Android)
Before you begin, make sure that…
- Your Smoke Gateway is fully charged.
- Your phone or tables Wi-Fi connection is enabled.
- You have installed the latest version of the ThermoWorks BBQ app on your phone or tablet.
- Your Smoke Gateway is within 300 feet line-of-sight of your Smoke (depending on obstructions between Smoke and Smoke Gateway) and close enough to your Wi-Fi router to get a strong connection.
- You know your secure 2.4GHz Wi-Fi network’s name and password, including the correct letter case and punctuation. You may use Smoke Gateway with an open network, as long as the network does not require a password.
- The network password is 27 characters or less, if required.
- The network security type is WPA/WPA2 or open.
Note: If you purchased your Smoke Gateway prior to 11/1/2019, you may need to update Smoke Gateway’s firmware (if you already haven’t) before beginning the setup process. Instructions for updating the firmware are found here.
(1) In the ThermoWorks BBQ App
- From the Menu, select Devices.
- Click on the Add Device button.
- Select Smoke Gateway from the popup menu.
(2) Sync Smoke and Smoke Gateway
- Hold down Smoke Gateway’s Power button. You will see two blue flashes, indicating that Smoke Gateway has turned on. Continue holding down the Power button until you see a flashing red light. The red light will continue to flash throughout the sync process.
- Power on Smoke.
- Hold down the Sync button (((•))) (located on the back of Smoke) until the Sync message appears on Smoke’s display.
- Smoke Gateway will display a solid red light, indicating that the sync is complete. After a brief delay, a purple light will begin to flash.
(3) In the ThermoWorks BBQ App
- Click on the Scan button.
- A list of available networks will appear. Choose a 2.4GHz Wi-Fi network to connect to or select Manual if your network name is not displayed or if you are using an open network.
- You may see a warning that the network may be a 5GHz network. If you are connecting to a 2.4GHz network, choose Proceed Anyway.
- Enter the network’s name and password, including the correct letter case and punctuation. Click OK.
- From the Find Smoke Gateway in Phone Settings screen, click on the Wi-Fi Settings link.
- Choose your Smoke Gateway’s network from the list of available networks. The network name will start with “Gateway.” (Example: Gateway_XXXXXX)
- If you are connecting your phone or tablet to Smoke Gateway for the first time, you may receive a check system notification that the Smoke Gateway network doesn’t have internet access. If you see this message, tap for options and select Stay Connected.
- Using your phone or tablet’s back button (located along the bottom edge of the screen), return to the ThermoWorks BBQ app.
- You will see the Searching For Smoke Gateway message. If you have not indicated in Step 7 that you wish to stay connected to your Smoke Gateway’s network, you may receive a check system notification that the Smoke Gateway network doesn’t have internet access. If you see this message, tap for options and select Stay Connected. You will return to the Searching for Smoke Gateway message. Click Next.
- Once your Smoke Gateway is connected, you will receive a message that your Smoke Gateway is ready to use.
Note: If you are interrupted during the setup process and find that you cannot continue through the steps, begin the setup process again.
Troubleshooting: Smoke Gateway Help File
Back to Top
F
Device Options
This section discusses how you access the Device Options for your thermometer.
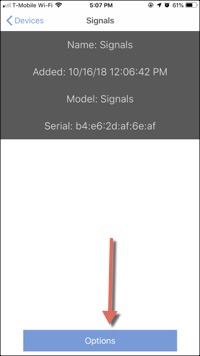
How to Access Your Device’s Options
1. From the Menu, select Devices.
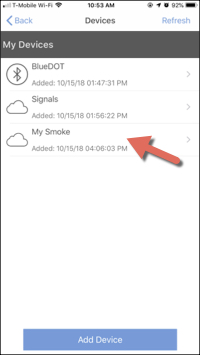
2. From the Devices screen, choose the device you wish to manage.
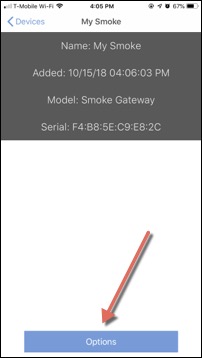
3. Click on the Options button to see the popup Device Options menu.
Important: Each type of thermometer has a different set of available Device Options, as shown below.
BlueDOT
- Rename Device
- Remove Device
- Connect (or Disconnect) Bluetooth
Signals
- Interval Rate (This is how often Signals sends a reading to the ThermoWorks BBQ app.)
- Network Settings
- Rename Device
- Remove Device
- Connect (or Disconnect) Bluetooth
- Unit F° (Switch between Fahrenheit and Celsius)
- Firmware Update
Smoke:
- Rename Device
- Remove Device
Back to Top
G
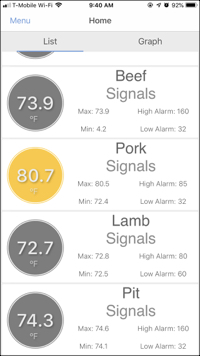
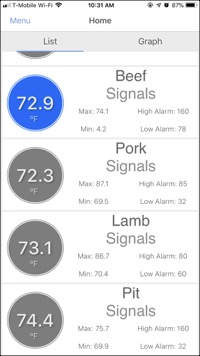
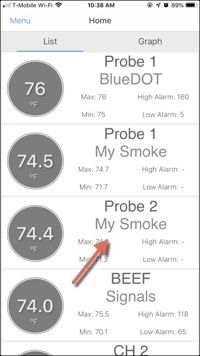
Home
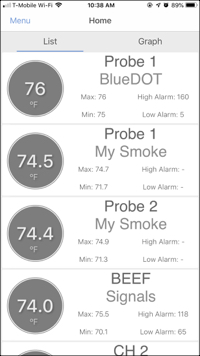
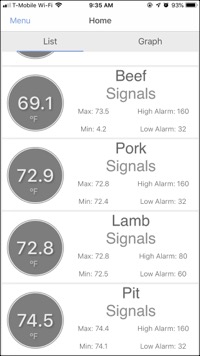
The Home screen is where you can access menus to change each connected probe’s settings and options. This is where you will access functions such as renaming probes, setting alarms, and more. Access the Home screen from the app’s Menu.
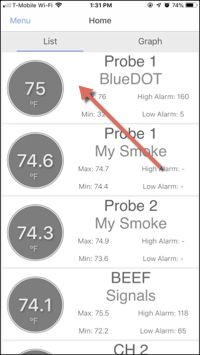
2. The Home screen contains a list of the probes that are connected to the ThermoWorks BBQ app. Each one indicates which device it is connected to. Click on a probe to access its settings.
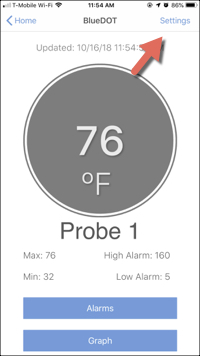
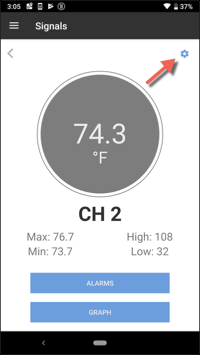
4. Click on Settings (iOS) or gear icon (Android) link at the top-right corner of the window to access Sensor Settings (or probe settings). Each device-type includes its own sensor (or probe) options, as indicated below:
BlueDOT
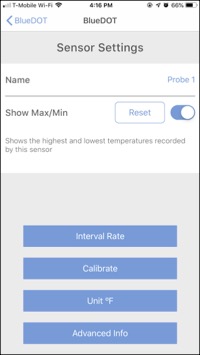
- Rename the probe by clicking in the Name field
- Reset Max/Min (The highest and lowest temperature recorded by the probe.)
- Change the Interval Rate (How often BlueDOT takes a reading.)
- Calibrate
- Unit F° (Switch between Fahrenheit and Celsius.)
- Access Advanced Info, such as device model, serial number, and battery level
Signals
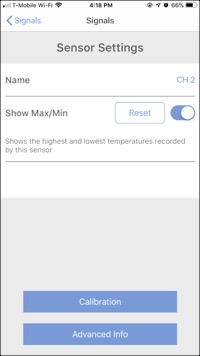
- Rename the probe by clicking in the Name field Important: The first four characters of the probe’s name will be displayed on Signal’s hardware.
- Reset Max/Min (The highest and lowest temperature recorded by the probe.)
- Calibration
- Access Advanced Info, such as device model, serial number, battery level, and Wi-Fi connection strength
Smoke Gateway
Important: Changing a Smoke probe’s sensor settings does not change the probe’s settings on Smoke’s hardware. Instead, the ThermoWorks BBQ app settings affect how your phone or tablet interacts with the temperature data it receives from Smoke via Smoke Gateway.
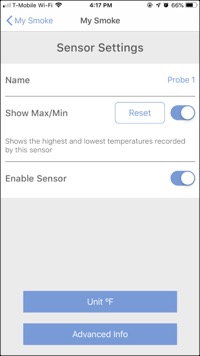
- Rename the probe by clicking in the Name field
- Reset Max/Min (The highest and lowest temperature recorded by the probe.)
- Enable Sensor (probe). Use this option to stop temperature readings in the app completely.
- Unit F° (Switch between Fahrenheit and Celsius)
- Access Advanced Info, such as device model, serial number, battery level, and Wi-Fi connection strength
Back to Top
H
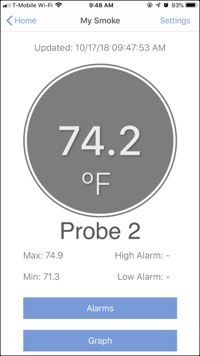
Probe Alarms
Choose the Home option from the Menu.
Choose the probe you wish to edit.

Click on the Alarms button to access the probe’s alarm settings.
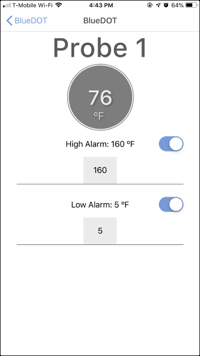
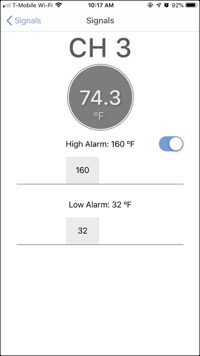
The current temperature of the sensor (located at the probe’s tip) is displayed in the circle. Touch the gray temperature boxes to change the High and Low alarms.
Use the toggle switch(es) to turn alarms off and on.
(Note: BlueDOT and Smoke Gateway have two alarm toggle switches. Signals has one alarm toggle switch.)
Important: The Low Alarm may not be set to a temperature higher than the High Alarm, even if the Low Alarm is turned off . The High Alarm must be set at least 5° above the Low Alarm.
Probe Channel Colors and How They Relate to Alarms
When a probe’s channel color is gray, it means that its sensor temperature has not yet reached 5° below the High Alarm set temperature or 5° above the Low Alarm set temperature.
When a probe’s channel color turns yellow, it means that its sensor temperature is within 5° of either the High Alarm or Low Alarm set temperature. The yellow color warns you that the High or Low Alarm set temperature will soon be reached.
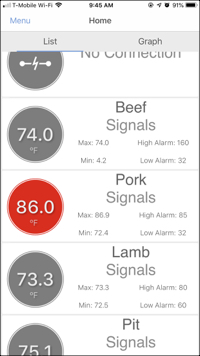
When a probe’s channel color turns red, it means that the High Alarm set temperature has been reached. It will remain red as long as the probe’s sensor stays at or above the set High Alarm temperature.
When a probe’s channel color turns blue it means that the Low Alarm set temperature has been reached. It will remain blue as long as the probe’s sensor stays at or below the set Low Alarm temperature.
Back to Top
I
Renaming the Probes
Note: If you wish to rename a probe, go to the probe’s home screen and access its Sensor Settings by clicking on Settings (iOS) or the gear icon (Android), found at the top-right corner of the probe’s settings window. (Menu>Home>Probe>Settings)
Touch the probe’s name to access the keyboard. Probe names are automatically saved.
Signals only: The first four characters of the probe’s name will be displayed on Signal’s hardware.
Back to Top
J
Change Device from Fahrenheit to Celsius
Smoke and BlueDOT
Access the Sensor Settings by clicking on Settings (iOS) or the gear icon (Android), found at the top-right corner of the probe’s settings window. (Menu>Home>Probe>Settings)
Choose the Unit C° option to switch your device from Fahrenheit to Celsius.
Signals
Choose the Signals device you wish from the Devices listing. (Menu>Devices)
Click on the Options button to access the Unit F° to switch your device from Fahrenheit to Celsius.
Back to Top
K
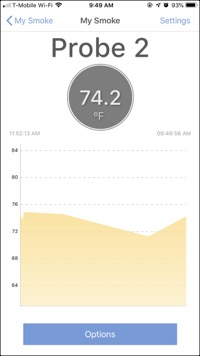
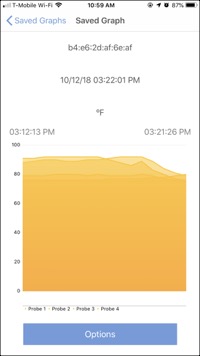
Important to Know about Graphs
While the ThermoWorks BBQ app graphs temperature data from each cook, each device’s graphing feature works differently.
BlueDOT
Because BlueDOT connects to your phone or tablet via Bluetooth (which is a local connection), the ThermoWorks BBQ app will graph data without stopping, as long as…
- You are logged into the ThermoWorks BBQ app account, and
- BlueDOT and your phone or tablet are connected via Bluetooth.
If the Bluetooth connection is interrupted, the current graph will also be interrupted. You may manually save and store graphs as often as you wish.
You may save ten graphs in the ThermoWorks BBQ app. You may export an unlimited number of graphs to save elsewhere.
Important: Once you log out of the ThermoWorks BBQ app, all BlueDOT graphing data is removed from your phone. If you wish to save BlueDOT graphs, make sure to export them prior to logging out of the app.
Signals
Signals connects to your phone or tablet via Bluetooth and Wi-Fi. The ThermoWorks BBQ app will graph data received from Signals for at least 25 hours (or 1500 readings) without restarting the graph, as long as…
- Signals is logged into your ThermoWorks BBQ app account, and
- Signals and your phone or tablet are connected via Bluetooth, or Signals is connected to the internet via Wi-Fi.
Once at least 25 hours has passed, the ThermoWorks BBQ app will automatically save the graph to the cloud and begin a new graphing session. You may manually save graphs anytime you wish.
Because Signals can connect to your phone or tablet via Bluetooth and Wi-Fi, it has an extra layer of protection against losing graphing information. As long as Signals is connected to your phone or tablet via Bluetooth, Signals will automatically use Bluetooth as a back-up connection if the primary Wi-Fi connection is lost or interrupted. As as soon as a Wi-Fi connection is re-established, Signals will use Wi-Fi as the primary connection.
If your phone or tablet is not also connected to Signals via Bluetooth, Signals uses its Wi-Fi connection exclusively to send temperature data to the ThermoWorks BBQ app via the internet. If Signal’s Wi-Fi connection is lost or interrupted, the graph will be interrupted until a Wi-Fi or Bluetooth connection is re-established.
You may save 10 Signals graphs to the cloud through the ThermoWorks BBQ app. You may export an unlimited number of graphs to save elsewhere.
Important: We recommend that you start a new graph with each new cook to ensure that the cook’s graph contains all of its information. Starting a new graph clears all pre-existing data.
Smoke Gateway
Because Smoke + Smoke Gateway connects to your phone or tablet via Wi-Fi, the ThermoWorks BBQ app will continuously graph data for at least 25 hours without restarting the graph, as long as…
- Smoke + Smoke Gateway is logged into your ThermoWorks BBQ app account, and
- Smoke is synced with Smoke Gateway, and
- Smoke Gateway is connected to the internet via Wi-Fi.
Once at least 25 hours has passed, the ThermoWorks BBQ app will automatically save the graph and begin a new graphing session. You may manually save graphs anytime you wish.
If the Smoke/Smoke Gateway sync is lost, or if Smoke Gateway loses its Wi-Fi connection to the internet, the graph will be interrupted until the sync and/or connection is re-established.
You may save and store 5 Smoke graphs in your ThermoWorks BBQ app account. You may export an unlimited number of graphs to save elsewhere.
Back to Top
L
Saving and Exporting Graphs
To manually save graphs, choose the probe you wish to access from the Home page. (Menu>Home)
Click on the Graph button.
Click on the Options button.
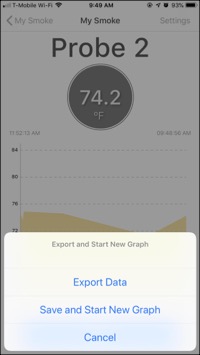
Choose Save and Start a New Graph or Export Data.
When you choose Save and Start a a Graph, the current graph saves to the Saved Graphs (Menu>Saved Graphs) and a new graph is started.
If you choose Export Data, the export contains all of the graph’s data to the moment of export; the current graph continues without interruption.
Exporting Single Probe Graph
From a single probe’s graph display, choose the Export Data option.
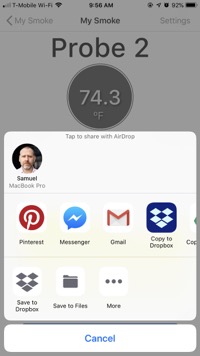
You may wish to email it to yourself or save it to a drive you can easily access. Exported graphs are saved as .csv files and can be opened in any spreadsheet program, such as Excel, Google Sheets, or Numbers.
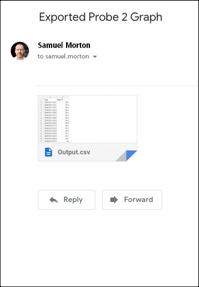
In this case, the file was emailed via Gmail.
Download the file to your device or hard drive. Save it to a location where you can easily find it again.
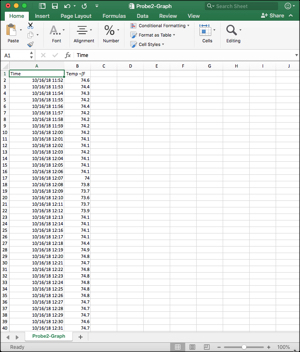
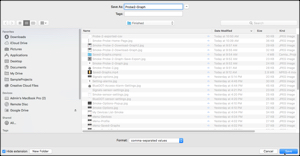
Open the .csv in spreadsheet software, such as Excel, Google Sheets, or Numbers.
Exporting Multiple Probe or Saved Graphs (Signals and Smoke Gateway)
From the Menu, select the Saved Graphs option.
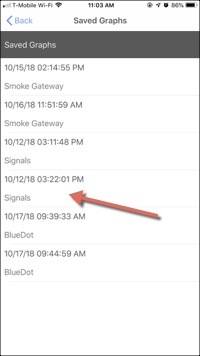
Choose the saved graph you wish to download.
Click on the Options button.
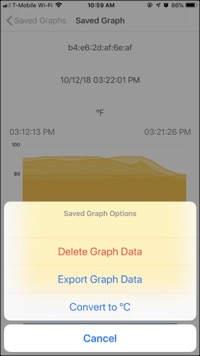
Choose Export Graph Data.
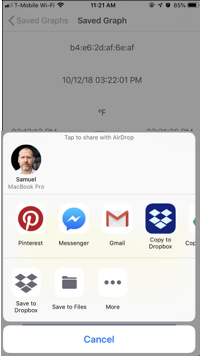
Select how you wish to save the .csv file. You may wish to email it to yourself or save it to a drive you can easily access.
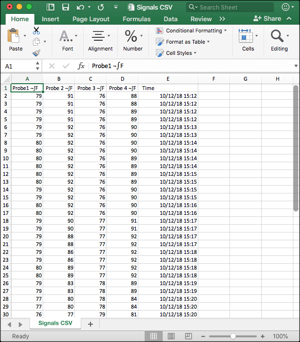
Locate the .csv file and open it in spreadsheet software, such as Excel, Google Sheets, or Numbers. Notice that the file contains information about all of the probes connected to Signals, along with timestamps of each reading.
Back to Top
M
Accessing and Using Graphs in ThermoWorks BBQ App
This video demonstrates how to access and use multi-probe saved graphs through the Saved Graphs listing.
You may access and use single-probe or unsaved graphs by choosing the probe you wish to work with from the Home page. (Menu>Home>Probe)
Back to Top
N
Profile
From the Menu, choose the Profile option.
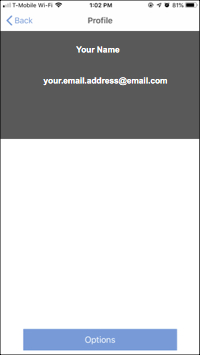
Click on the Options button to open the Profile Options popup menu.

Select the option you wish to access or Cancel.
Back to Top
O
Troubleshooting
Check these articles to find additional help with your particular thermometer.