Top
Notice: The ThermaQ app is no longer supported and has been replaced by the ThermoWorks app. The icon has a yellow background.

This help file contains instructions for the topics below.
Before You Start
Adding Your Device
- Setting Up Your ThermaQ WiFi (iOS)
- Setting Up Your ThermaQ WiFi (Android)
- Troubleshooting Your ThermaQ WiFi Setup
- Setting Up Your ThermaQ Blue
Using the ThermaQ App
- Device Options (Connect, Disconnect, and Forget All Devices)
- Setting Sensor (Probe) Alarms
- Managing Sensors (Renaming, Enable or Disable Sensor, Enable or Disable Mix/Min)
- Sensor Channel Colors and How They Relate to Alarms
- Change Device from Fahrenheit to Celsius, Selecting Measurement Interval
- Advanced Info
- About Graphs (Saving, Accessing, Interruptions, Exporting, and Removing)
- Alarm Notification Settings
A
ThermaQ App Installation
iOS
- Download the free ThermaQ app from the iTunes App Store.
- Open the app. When you begin, you’ll see a pop-up message asking if you wish to allow the ThermaQ app to send alerts. Select Allow.
- The ThermaQ app is ready to use.
Android
- Download the free ThermaQ app from the Google Play Store.
- Open the app. When you begin, you’ll receive a terms and conditions notice. Click OK.
- Next, you’ll be asked if you want to enable Location for the ThermaQ app. Choose Enable.
- Depending upon your Android phone’s model, you may be asked if you wish to allow ThermaQ access to your device’s location. Choose Allow. (If you do not see this message, go to your phone or tablet’s location settings and give the ThermaQ app location access.)
- The ThermaQ app is ready to use.
Back to Top
B
Important to Know
How Many Devices May Connect to the ThermaQ App at Once?
You may connect up to four ThermaQ WiFi and four ThermaQ Blue devices on a single phone or tablet
How Many Phones or Tablets Can Connect to a Single ThermaQ WiFi?
You may connect an unlimited number of phones or tablets to a single ThermaQ WiFi.
How Many Phones or Tablets Can Connect to a Single ThermaQ Blue?
You may connect one phone or tablet to a single ThermaQ Blue.
Type of Connection and Range Limits
ThermaQ WiFi connects to the ThermaQ App using a 2.4GHz network. Your ThermaQ WiFi should be close enough to the Wi-Fi router to receive a strong enough signal to connect (and stay connected) to the Internet. Your phone or tablet must also be connected to the Internet via a Wi-Fi connection or a data plan.
ThermaQ WiFi will communicate with your phone or tablet through the internet, no matter how far away you go, as long as the following is true:
- ThermaQ WiFi has been setup on a 2.4GHz Wi-Fi network with an internet connection.
- Your phone or tablet has an internet connection to receive the data (either Wi-Fi or cellular data).
ThermaQ Blue will communicate via Bluetooth with your phone or tablet up to 150-feet line-of-sight, unless other factors are involved.
- Devices that use 2.4GHz radio frequencies (microwave ovens, cordless phones, remote controls, etc.) may create interference.
- The signal may be interrupted by walls and building materials, such as tinting on windows.
Communication Between the ThermaQ App and Devices
There is one-way communication between ThermaQ WiFi/ThermaQ Blue and the ThermaQ app, meaning that you will set up all alarms in the ThermaQ App. Your phone or tablet will alert you when the probe temperature limits you have set in the app have been reached. (While you can observe temperature data on your thermometer’s screen, you will not receive alarms or notifications from the ThermaQ WiFi/ThermaQ Blue hardware.)`
Back to Top
C1
Setting Up Your ThermaQ WiFi (iOS)
Before you begin, make sure that…
- Your ThermaQ WiFi has 2 new AA batteries installed.
- You have installed the latest version of the ThermaQ app on your phone or tablet.
- Your ThermaQ WiFi is close enough to your Wi-Fi router to get a strong connection and your Wi-Fi router is connected to the Internet.
- Your phone is connected to the Internet.
- You know your secure 2.4GHz Wi-Fi network’s name and password, including the correct letter case and punctuation. You may use ThermaQ WiFi with an open network, as long as the network does not require a password.
- The network password is 27 characters or less, if required.
- The network security type is Open, WEP, WPA1, or WPA2.
- Your ThermaQ WiFi is powered on.
In the ThermaQ App
- Open the app.
- Select the Wi-Fi tab. If you don’t see the Wi-Fi tab, click on the top-left menu and choose Devices from the drop-down list.
- Click on the Add Device button.
- Read the Before you begin… notifications. Click Next.
On Your ThermaQ WiFi’s Hardware
Simultaneously hold down ThermaQ WiFi’s Start and Max/Min buttons for 5 seconds or until SEt uP appears on the screen. Return to the ThermaQ app and click Next.
In Your Phone or Tablet’s Settings Menu
- From your phone or tablet’s Settings menu, choose the Wi-Fi setup option.
- Choose your ThermaQ WiFi’s network from the list of available networks. The network name will start with “ThermaQ.” (Example: ThermaQ WiFi DXXXXXXXX) Return to the ThermaQ app and click Next.
In the ThermaQ App
- You will be shown the ThermaQ WiFi Device Set up dialogue. Click on the yellow button labeled “Go to http://my.thermaqwifi/”
In the ThermaQ WiFi Configuration Screen
- Choose your local WiFi networks network name, security type, and security key (password). Do not copy and paste the password into the field.
- If the connection is made, click on the Continue button.
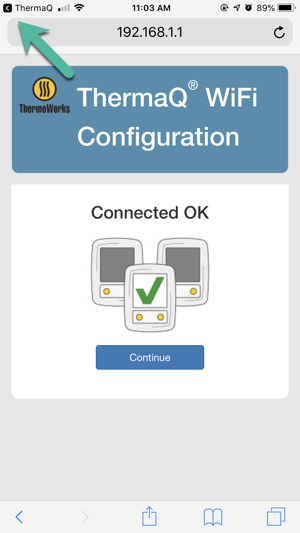
- Click on the ThermaQ arrow, found at the top-left corner of your screen, to return to the ThermaQ app and continue the setup process. Click Next.
In the ThermaQ App
- Enter your ThermaQ WiFi’s serial number (found on the back of your ThermaQ WiFi). Click Next.
On Your ThermaQ WiFi’s Hardware
Press your ThermaQ WiFi’s Start button 5 times. You will be shown the pairing key you will enter in the ThermaQ app.
Note: If your hardware is still displaying the SEt uP message and pressing the Start button 5 times does not retrieve the pairing key, hold down the Start button until you return to the home screen. Then, press the Start button 5 times to retrieve the pairing key.
In the ThermaQ App
Enter the pairing key in the form. Your ThermaQ WiFi will then be paired with your phone or tablet. Click Done to continue using your ThermaQ WiFi. It will take up to 1 minute before the ThermaQ app displays current probe temperatures.
Back to Top
C2
Setting Up Your ThermaQ WiFi (Android)
Before you begin, make sure that…
- Your ThermaQ WiFi has 2 new AA batteries installed.
- You have installed the latest version of the ThermaQ app on your phone or tablet.
- Your ThermaQ WiFi is close enough to your Wi-Fi router to get a strong connection and your Wi-Fi router is connected to the Internet.
- Your phone is connected to the Internet.
- You know your secure 2.4GHz Wi-Fi network’s name and password, including the correct letter case and punctuation. You may use ThermaQ WiFi with an open network, as long as the network does not require a password.
- The network password is 27 characters or less, if required.
- The network security type is Open, WEP, WPA1, or WPA2.
- Your ThermaQ WiFi is powered on.
In the ThermaQ App
- Open the app.
- Select the Wi-Fi tab. If you don’t see the Wi-Fi tab, click on the top-left menu and choose Devices from the drop-down list.
- Click on the Add Device button.
- Read the Before you begin… notifications. Click Next.
On Your ThermaQ WiFi’s Hardware
Simultaneously hold down your ThermaQ WiFi’s Start and Max/Min buttons for 5 seconds or until SEt uP appears on the screen. Go back to the app and click Next.
In Your Phone or Tablet’s Settings Menu
- From your phone or tablet’s Settings menu, choose the Wi-Fi setup option.
- Choose your ThermaQ WiFi’s network from the list of available networks. The network name will start with “ThermaQ.” (Example: ThermaQ WiFi DXXXXXXXX) Return to the ThermaQ app and click Next.
In the ThermaQ App
- You will be shown the ThermaQ WiFi Device Set up dialogue. Click on the yellow button labeled “Go to http://my.thermaqwifi/”
In the ThermaQ WiFi Configuration Screen
- Choose your local WiFi networks network name, security type, and security key (password). Do not copy and paste the password into the field.
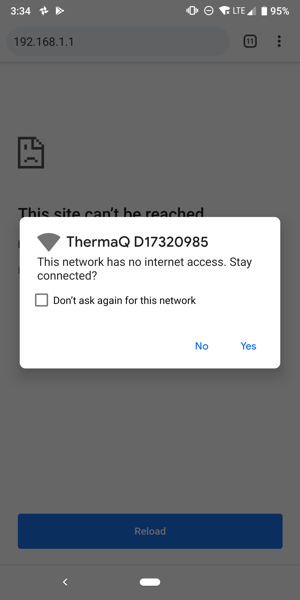
Note: If you receive an error, check for an Android system notification that the ThermaQ network has no internet access. Choose Yes to let the ThermaQ network stay connected. To make the connection easier in the future, check the Don’t ask again for this network box.
- If the connection is made, click on the Continue button.
Note: If you cannot complete this step, see the Troubleshooting section below.
- Return to the ThermaQ app and click Next.
In the ThermaQ App
- Enter your ThermaQ WiFi’s serial number (found on the back of your ThermaQ WiFi). Click Next.
On Your ThermaQ WiFi’s Hardware
Press your ThermaQ WiFi’s Start button 5 times. You will be shown the pairing key you will enter in the app.
Note: If your hardware is still displaying the SEt uP message and pressing the Start button 5 times does not retrieve the pairing key, hold down the Start button until you return to the home screen. Then, press the Start button 5 times to retrieve the pairing key.
In the ThermaQ App
Enter the pairing key in the form. Your ThermaQ WiFi will then be paired with your phone or tablet. Click Done to continue using your ThermaQ WiFi. It will take up to 1 minute before the ThermaQ App displays current probe temperatures.
Back to Top
C3
Troubleshooting Your ThermaQ WiFi Setup
If you have completed part of the set up and when you return to the app to finish, you see the Add a Device screen (which makes it appear as if you have to start over), click on the Add a Device button and then, click on the Next links until you arrive at the point you haven’t completed yet.
Important to know about ThermaQ WiFi’s SEt uP mode:
- To enter ThermaQ WiFi’s setup mode, simultaneously press and hold the Start and Max/Min buttons for 5 seconds.
- You may not make a Wi-Fi connection to ThermaQ WiFi unless it is in set up mode, indicated by the SEt uP message on the display.
- If your ThermaQ WiFi has been previously connected to your network’s Wi-Fi router, the setup mode has a timeout limit of 60 seconds once the SEt uP message is displayed and up to 5 minutes to send new router settings. If you don’t connect your phone or tablet within the timeframe, your ThermaQ WiFi will automatically leave the setup mode and resume its previous network connection.
If you enter the wrong security key (password) and get stuck…
- Make sure your phone or tablet is connected to the Internet.
- Close and reopen the app and restart the setup process again.
If ThermaQ WiFi gets stuck on the SEt uP screen…
- Hold down the Start key until ThermaQ WiFi returns to the home screen or,
- Power off ThermaQ WiFi by holding down the Start button until the screen goes blank. Power back on and start the set up process again.
If your ThermaQ WiFi’s display is blank…
- Check that the batteries are installed according to the correct polarity and that they have enough charge to power ThermaQ WiFi.
- Try turning ThermaQ WiFi on by pressing and holding down the Start button.
If you press Start 5 times and the pairing key doesn’t display when it should (you see probe temperatures instead)…
Press Start button 5 times again and the pairing key will display.
If you are having trouble connecting ThermaQ WiFi to your Wi-Fi network…
• A Wi-Fi connection strength test you can easily try is to take your phone next to ThermaQ WiFi and disconnect it from its cellular data signal. Then, see if your phone can connect to your local Wi-Fi 2.4GHz network correctly. If your phone has difficulties connecting (or staying connected), you will know that your local Wi-Fi network’s 2.4GHz signal isn’t strong in that area.
• Try moving ThermaQ WiFi to a different spot.
• Consider using a Wi-Fi booster to increase your network’s Wi-Fi range.
• Make sure you have downloaded and installed the latest version of the ThermaQ app.
• Try restarting both your ThermaQ WiFi and phone or tablet.
• Make sure that you have a Wi-Fi or internet connection on your phone or tablet.
• Make sure you that location services are enabled on your phone or tablet and that the ThermaQ app is authorized to use location services. (You will find location services in your phone or tablet’s settings.)
• If your local network includes both a 5GHz and a 2.4GHz connection, try moving ThermaQ WiFi outside of the range of your 5GHz network, but still within the range of your 2.4GHz network. This will prevent your phone or tablet from auto-connecting to the 5GHz network.
• Try disabling your phone or tablet’s Bluetooth connection as Bluetooth can sometimes create Wi-Fi interference. You can turn it back on once ThermaQ WiFi has been set up.
• Try disabling your phone’s cellular data during the setup process. You can turn it back on once ThermaQ WiFi has been set up.
• If you are using an Android phone or tablet and your network’s router has commercial settings, the connection window (the screen after you enter your network’s name and password) may seem stuck or you will receive an error reading, “Please manually reconnect your device to the instrument WiFi,” making it appear that ThermaQ WiFi won’t connect to Wi-Fi when, in fact, it has been connected. Return to the ThermaQ app and continue the setup process by hitting Next.
Back to Top
D
Setting Up Your ThermaQ Blue
Before you begin, make sure that…
- Your ThermaQ Blue has 1 new battery installed.
- You have installed the latest version of the ThermaQ app on your phone or tablet.
- Bluetooth is enabled on your phone or tablet.
- Location services are enabled on your phone or tablet and that the ThermaQ app is authorized to use location services. (You will find location services in your phone or tablet’s settings.)
- ThermaQ Blue is not connected to another phone or tablet.
- Your ThermaQ Blue is powered on.
In the ThermaQ App
- Open the app.
- Select the Bluetooth tab. If you don’t see the Bluetooth tab, click on the top-left menu and choose Devices from the drop-down list.
- Look for your ThermaQ Blue in the list of devices. If you do not see it in the list, hit the refresh button or swipe down to refresh the list.
- Once you see your ThermaQ Blue, click on the + Connect button.
Your ThermaQ Blue will then be paired with your phone or tablet. Click Done to continue using your ThermaQ Blue. It will take up to 1 minute before the ThermaQ App displays current probe temperatures.
Important to remember: Your ThermaQ Blue can only connect to one phone or tablet at a time.
Back to Top
E
Device Options
The ThermaQ app allows you to connect, disconnect, or forget all devices.
- To connect to a new ThermaQ WiFi, follow the set up directions. (Found above)
- To disconnect from devices, click on the orange ✓ Connected button.
- To forget all of the ThermaQ WiFi and ThermaQ Blue devices…
- Android: Settings>Forget All Devices
- iOS: Settings>Clear All Device Data
Back to Top
F
Setting Sensor (Probe) Alarms
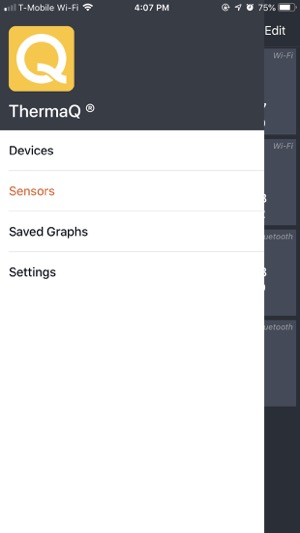
Choose Sensors from the drop-down menu.
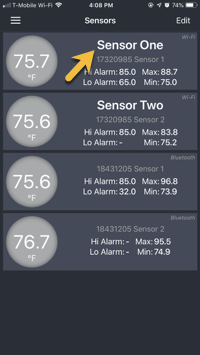
Choose the sensor you wish to edit.
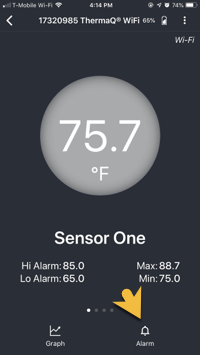
Click on Alarm to access the probe’s alarm settings.
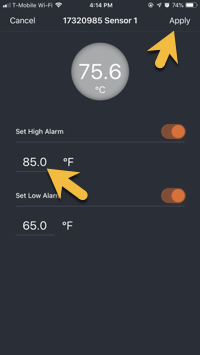
The current temperature of the sensor (located at the probe’s tip) is displayed in the circle. Touch the current settings to edit the temperatures.
iOS: Click Apply to finish.
Android: Use toggle switch off and back on again to apply the temperature change.
Use the toggle switch(es) to turn alarms off and on.
Important: The Low Alarm may not be set to a temperature higher than the High Alarm, even if the Low Alarm is turned off . The High Alarm must be set at least 5° above the Low Alarm.
Back to Top
G
Managing Sensors
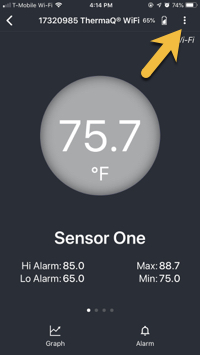
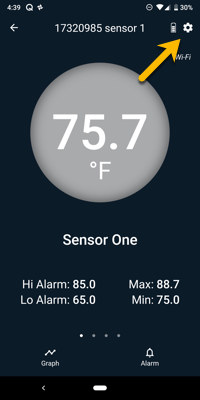
Access the Sensor Settings by clicking on Settings Menu (iOS) or the gear icon (Android), found at the top-right corner of the probe’s settings window, to…
- Rename the probe by clicking in the Name field.
- Reset Max/Min (the highest and lowest temperature recorded by the probe).
- Enable or disable the sensor.
Back to Top
H
Sensor Channel Colors and How They Relate to Alarms
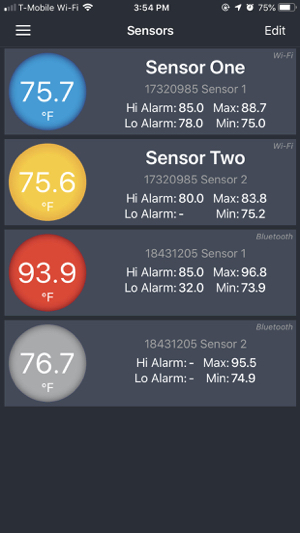
When a probe’s channel color is gray, it means that its sensor temperature has not yet reached 5° below the High Alarm set temperature or 5° above the Low Alarm set temperature.
When a probe’s channel color turns yellow, it means that its sensor temperature is within 5° of either the High Alarm or Low Alarm set temperature. The yellow color warns you that the High or Low Alarm set temperature will soon be reached.
When a probe’s channel color turns red, it means that the High Alarm set temperature has been reached. It will remain red as long as the probe’s sensor stays at or above the set High Alarm temperature.
When a probe’s channel color turns blue, it means that the Low Alarm set temperature has been reached. It will remain blue as long as the probe’s sensor stays at or below the set Low Alarm temperature.
Back to Top
I
Change Device from Fahrenheit to Celsius, Selecting Measurement Interval
Access the Sensor Settings by clicking on Settings Menu (iOS) or the gear icon (Android), found at the top-right corner of the probe’s settings window.
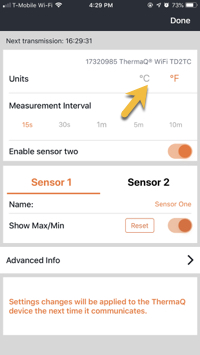
Choose the Unit C° option to switch your device from Fahrenheit to Celsius.
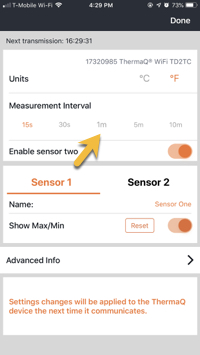
Select the Measurement Interval (how often the ThermaQ app updates) here. (Keep in mind that the more frequent the update, the more battery is used.)
ThermaQ WiFi: 15 and 30 seconds, 1, 5, 10 minute intervals.
ThermaQ Blue: 1,5,10, and 30 second intervals
Back to Top
J
Advanced Info
ThermaQ WiFi
The Advanced Info screen displays your ThermaQ WiFi’s serial number, thermometer type, battery level, and firmware reversion.
ThermaQ Blue
The Advanced Info screen displays the firmware reversion, model, software version, and hardware version. You may also set an Auto Off Interval which determines when (or if) ThermaQ Blue automatically powers down.
Back to Top
K
About Graphs
Saving Graphs
You may save as many sensor graphs as you wish in the ThermaQ app. Each sensor’s graph is saved separately.
To save graphs, choose the sensor you wish to access from the Sensors page. (Menu>Sensors)
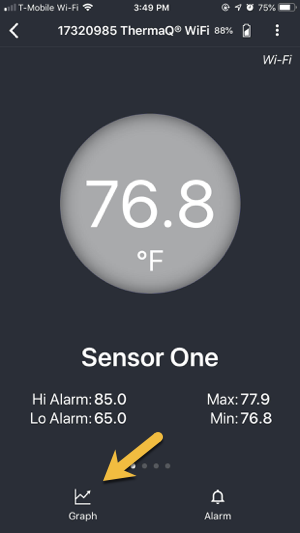
Click on the Graph link.
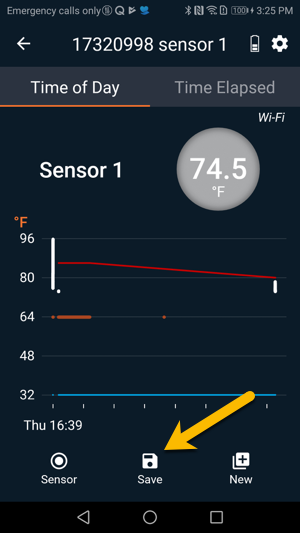
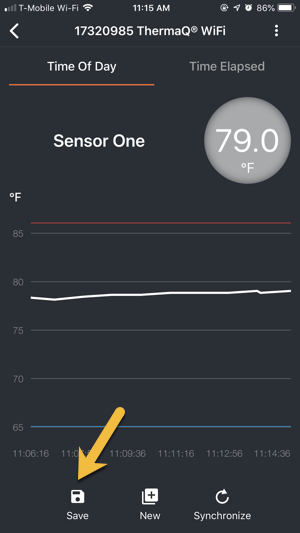
Click on the Save icon and name the graph when the pop-up dialogue appears.
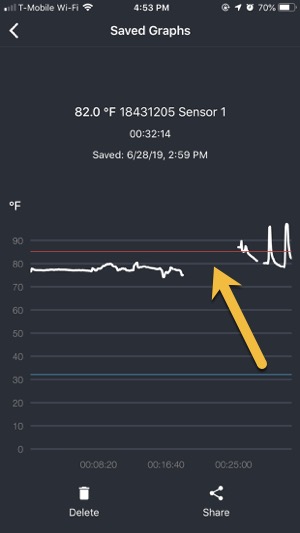
To Access Your Saved Graphs
Browse to the Saved Graph menu item (Menu>Saved Graphs)
Graphing Interruptions
ThermaQ Blue
If the Bluetooth connection is interrupted, the current graph will also be interrupted. The graph will resume as soon as the Bluetooth connection is re-established.
ThermaQ WiFi
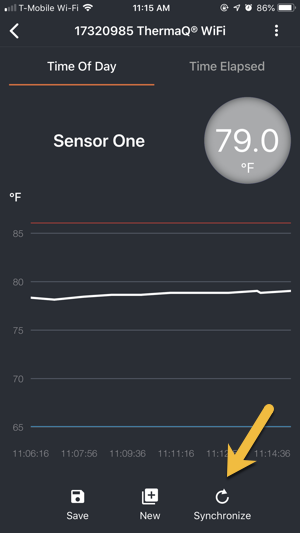
iOS: If the ThermaQ app is pushed to the background by the iOS operating system, the operating system automatically disconnects the ThermaQ app from Wi-Fi. If this happens, ThermaQ WiFi saves information about the cook so it is not lost. Once the Wi-Fi connection is re-established and you click on the Synchronize link, the graph will fill in.
Note: The Android operating system does not automatically disconnect the ThermaQ app from Wi-Fi if the app goes into the background, so the Synchronize function is not necessary. However, if your Android device turns on its battery optimization feature, it may shut down the ThermaQ app in order to save battery life.
Exporting Graphs
You may export and share as many graphs as you’d like. You may wish to email graphs to yourself or save it to a drive you can easily access.
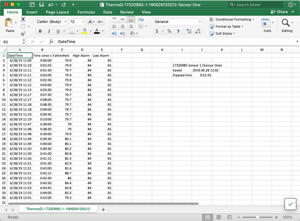
Exported graphs are saved as .csv files and can be opened in any spreadsheet program, such as Excel, Google Sheets, or Numbers.
To Export a Graph
- From the list of Saved Graphs, tap on the graph you wish to share.
- Touch the Share icon.
- Choose the method you wish to use to share the graph with (email or save to a drive).
Removing Graphs
Android: If you choose the Forget All Devices option in the Settings menu, all of the graphs you have saved for your connected devices will be removed. You can also choose to remove graphs from the app without forgetting connected devices through the Clear Saved Graphs in the Settings menu.
iOS: If you use the Clear All Device Data option in the Settings menu, all devices that you’ve connected to the ThermaQ app will be forgotten and associated graphs will be removed.
Back to Top
L
Alarm Notification Settings
Important to Know About Notifications
- Make sure your phone or tablet isn’t set to silent or vibrate.
- When the ThermaQ app isn’t open, it will send push notifications, so you must make sure you have allowed notifications and permissions to occur in your phone/tablet’s notifications settings. Sometimes, people don’t know what their phone/tablet’s default push notification sounds like or they have their phone/tablet on vibrate, so they don’t realize that a notification has occurred.
- Some phones/tablets have settings that disable apps that are not being used. This will close the app until you reopen it and look at the data. If this is the case with your phone or tablet, we recommend disabling this setting or, at least, be aware that it may be an issue.
To Enable Sound Notifications
iOS:
In the ThermaQ App: Settings>Alarm Sound On
In your phone or tablet’s Settings: Notifications>ThermaQ>Allow Notifications and Sounds. Choose the Banner Style (Temporary or Persistent) you wish to use.
Android:
In the ThermaQ App: Settings>Repeat Sensor Alerts On (to receive continuous sound alerts)
In the Android Notification Settings: All notification settings On
Silencing Alarms
- If you silence alarms from a Sensor’s Alarm settings, you will silence alarms on all ThermaQ WiFi connected devices.
- To silence continuous alarms on your Android phone or tablet without silencing alarms on other ThermaQ WiFi connected devices, go to Settings and toggle Repeat Sensor Alerts off.
- iOS: To silence alarms, touch your phone or tablet’s screen.