Table of Contents
- Incorrect wiring between the power source, the controller (Signals, Smoke X, ThermaQ2, etc), and Billows®
- Insufficient power supply
- Damaged components
- The probe is not installed in the “Billows” channel, or the probe is damaged
- Actual Temperature is above the set temperature
- Too much airflow
- Billows Fan Plug is still installed
- Interrupted communication with the controller
- Additional Tips for Use
Incorrect wiring between the power source, the controller (Signals, Smoke X, ThermaQ2, etc), and Billows®
- Unplug all of your components.
- Using a secondary electronic device or voltage tester, confirm that your power outlet has power. Tripped circuit breakers, worn-out plugs, and other electrical problems in the power supply are easy to overlook, especially in an outlet that isn’t used very often.
- Confirm that you are using the ThermoWorks 12-volt power adapter or a Billows® 12V Battery Bank to power the device. A generic 5-volt adapter or battery pack won’t deliver enough power to effectively power both the controller and the fan. For that reason, we recommend ONLY using original ThermoWorks power supply adapters or a Billows® 12V Battery Bank.
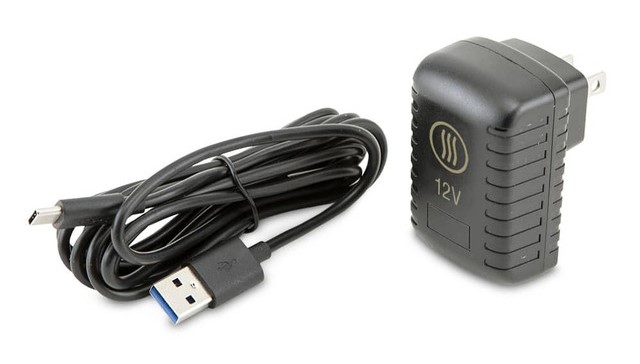

- Run the USB-C to USB-A cable from the power supply to the Billows® Fan Adapter (y-splitter) and ensure that it’s properly seated in the side labeled “Power.” If using the Billows 12V Battery Bank, ensure that you’re using the side of the battery bank labeled “OUTPUT.”
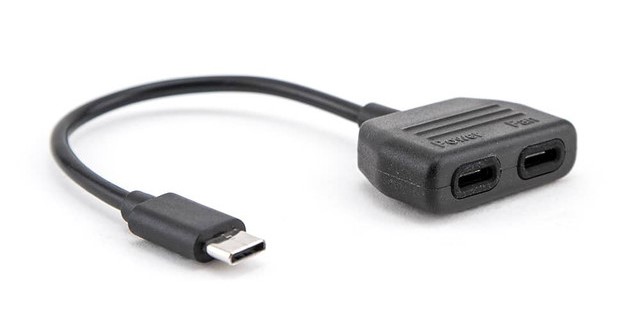
- Run the second USB-C to USB-C cable from Billows to the Billows® Fan Adapter (y-splitter) and ensure that it’s properly seated in the side labeled “FAN.” Double-check that the power cable is plugged into the approved power source and into the side of the splitter labeled “Power.”
- Plug the single end of the splitter into the device that you are using to measure The temperature and control the fire, as seen below. These devices include Signals, Smoke X, ThermaQ2, and RFX GATEWAY
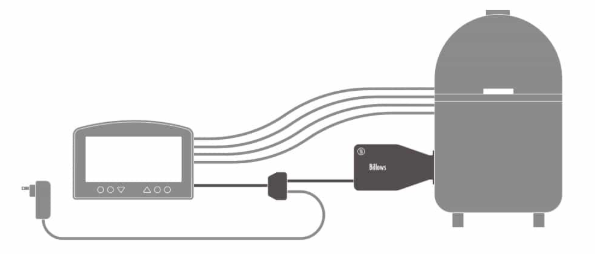
- Plug your Pro-Series High Temp Air Probe or a K-type air probe into the “Billows” port on your controller. For most models, that is the lowest channel on the device (labeled “4” or “2”). If using RFX GATEWAY, there is only one port. If your model has a display, the display will indicate that the “fan” is connected with a small icon.
- Assuming the “Billows” channel has a set temperature above the current temperature being read the probe, Billows will immediately power on indicating a successful configuration. You may then install the air probe on the grate of your smoker, approximately 1″ from your meat, and your Billows fan onto your prelit smoker. NOTE: If Billows doesn’t turn on immediately, ensure that the set temp is above the current temperature and that the power supply and cables are all seated properly in their ports. Check each connection for signs of excessive heat or poor fit.
Insufficient power supply
- Using a secondary electronic device or voltage tester, confirm that your power outlet has power. Tripped circuit breakers, worn-out plugs, and other electrical problems in the power supply are easy to overlook, especially in an outlet that isn’t used very often.
- Confirm that you are using the ThermoWorks 12-volt power adapter or a Billows® 12V Battery Bank to power the device. A generic 5-volt adapter or battery pack won’t deliver enough power to effectively power both the controller and the fan. For that reason, we recommend ONLY using original ThermoWorks power supply adapters or a Billows® 12V Battery Bank.
- Run the USB-C to USB-A cable from the power supply to the Billows® Fan Adapter (y-splitter) and ensure that it’s properly seated in the side labeled “Power.” If using the battery bank, ensure that you’re using the side of the battery bank labeled “OUTPUT.”
- Billows must have an external power source. The batteries in the controllers do not supply enough power to run Billows.
- NOTE: Some third-party power supplies provide just enough power to allow the fan to power on, but at a very low, and unsustainable speed. If you can’t hear Billows blowing, but you can see the internal fan moving, you have insufficient power supply and need to recheck your power supply using the instructions listed above.
Damaged components
- Unplug all the components
- Inspect each connection, device, and cable for scarring, melting, kinking, or other signs of trauma.
- If there are no signs of trauma, reconnect all the components and feel each connection, housing, and splitter for excess heat. None of the components should feel warm to the touch. If one of the components is warm, contact Tech Support for the next steps.
The probe is not installed in the “Billows” channel or the probe is damaged
- Ensure that the probe is plugged into the Billows channel. This will be the “last” channel on your device (either 2 or 4) or ensure that it’s plugged into the RFX GATEWAY probe port.
- Check that the probe plugged into the Billows channel on your device is displaying realistic temperatures. If there is no reading on the display, check the connection in the port. If the port has worn out and there is play in the port, contact our Tech Support team.
- If the temperatures are bouncing around or show to be dozens of degrees higher or lower than expected, try another probe in that port and see if the behavior is the same. If the alternative probe is readying correctly, you need a new probe.
Actual Temperature is above the set temperature
- When igniting your fuel, especially if doing so right in the smoker, temporarily remove the air probe so as to not overheat it with direct contact with the flames. Replace the probe once the fire has died down and flames are no longer present.
- Let your cooker temperature stabilize before making any adjustments to the exhaust vent. Usually, this will be when the fire dies down, and the heat is being provided by the coals. This can vary by smoker, but 30 minutes after lighting the fuel is a great place to start.
- Billows controllers automatically calculate the high and low alarms to ±25°F from your Set Temp. If the low alarm has been triggered, check your fuel levels. If the high alarm has been triggered, your fire is getting too much oxygen without the fan blowing. Ensure all intake vents other than the fan are closed and, if needed, adjust the exhaust vent to a more closed position.
Too much airflow
- Too much airflow can cause fires to grow at an expedited and unhelpful pace. Restrict air flow by closing vents or using the included flue tape to block all inlet vents not used by the fan. The fan will provide the oxygen needed for the fire.
- More efficient smokers, like the ceramic-insulated varieties, might require even less airflow than Billows provides. In that case, a Billows® Damper may be needed. It offers 16 adjustable positions to restrict the airflow further. Additionally, wind can push more air than needed through Billows, making it difficult to control the temperature. To mitigate this, try repositioning Billows away from the wind or adjusting your Billows® Damper to restrict that unwanted airflow.
- Start with the exhaust vent 1/8 of the way open. If the fire struggles to stay lit, adjust the exhaust vent to find the proper positioning for your smoker setup. Begin by closing all inlet vents not used by the fan. Use the included flue tape to seal any unwanted inlet openings. The fan will provide the oxygen needed to properly control the fire.
Billows Fan Plug is still installed
- Billows come with a Fan Plug installed. This plug is to help keep dust and debris from getting in the device when not in use and to also help stop airflow going into your smoker after you’ve turned off your Billows.
- Remove this plug before turning your Billows on, to avoid damage done to your Billows.
Interrupted communication with the controller
- Turn the controller off
- Unplug the splitter from the host
- Plug the splitter back in
- Turn the controller on
- Confirm “Fan” shows on the display
Tips for Use
- Install Billows with the fan intake and USB-C port facing down. This prevents liquid from getting into the fan and electronics, causing damage.
- Avoid the sides of your smoker or other hot spots when running the USB-C cables. The heat can melt them and render them inoperable.
- For best results, install the air probe in the grate clip and attach it approximately 1″ away from your food, while keeping it near the center of the cooker. Any closer and the cold meat can artificially deflate your air temperature. Further away, you may be taking temperatures in an area that isn’t uniform or that doesn’t accurately represent the average air temperature in your smoker.
- If you have a large smoker or find one fan is not enough, you can run two fans by purchasing a second Billows and the Expansion kit.