Before You Start
A 12-volt AC adapter (included with Billows or purchased separately here) or a Billows® 12V Battery Bank is required to power Billows.
Here is a video that demonstrates how to set up Smoke X with Billows.
Adding Billows to Your Smoker
Inlet Vents
Begin by closing all inlet vents not used by the fan. Use the included flue tape to seal any unwanted inlet openings. The fan will provide the oxygen needed to properly control the fire.
Exhaust Vent
Start with the exhaust vent ⅛ of the way open. This can be adjusted later if necessary.
Installing Billows on Your Smoker
1. Begin by pinching Billows’ spring arms and inserting them through the vent hole. Be sure to place the fan intake and USB-C port facing down. This prevents liquid from getting into the fan and electronics (which would cause damage).
2. Remove the yellow silicone fan plug before use.
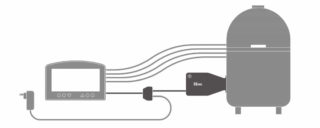
3. Plug one end of the USB-C cable into Billows and the other end into the fan port on the fan adapter.
4. Plug the 12V AC power adapter into the power port on the fan adapter
Important: AC power supplied by the ThermoWorks 12V power adapter or a Billows® 12V Battery Bank is required to run Billows.
5. Plug the fan adapter into your Smoke X.
Important: Avoid the side of your smoker when running the USB-C cables. The heat can melt them.
6. Plug your Pro-Series® High Temp Air Probe into your Smoke X2’s Channel 2 port or your Smoke X4’s Channel 4 port.
Important: Billows will not operate without a probe plugged into the correct channel.
- Smoke X2 uses the temperature reading from Channel 2 to control Billows.
- Smoke X4 uses the temperature reading from Channel 4 to control Billows.
7. Place the air probe in your smoker. For best results, install the control air probe in the grate clip and attach them approximately 1” away from your food, while keeping it near the center of the cooker.
8. Power your Smoke X on; it will automatically change the correct channel to fan mode. Billows is preset to establish and maintain a 225°F cooking temperature in your smoker/cooker and will start blowing immediately. You may adjust the Set Temperature at will.
Adjusting Set Temperature
1. To adjust your set temperature on your Smoke X, press the CH button until Channel 2 (Smoke X2) or Channel 4 (Smoke X4) flashes.
2. Press SET twice. SET TEMP should begin to flash.
3. Adjust the set temp with the Up and Down arrows. When the desired temperature is selected, press SET again to save your temperature.
4. Smoke X automatically sets High and Low alarms to ±25°F of the Set Temp. They cannot be adjusted in fan mode.
Tips for Controlling Your Fire
For best results, stack your fuel in a mound with a plateau at the top where the lit fuel will be added.
1. Fully light ½ -¾ of a chimney worth of fuel and place at the top of your unlit mound. Start with less fully lit fuel, as this will allow Billows to get the fire to temperature instead of beginning with a fire that is too big.
2. Let Billows run for 15-30 minutes to preheat your smoker/cooker and to stabilize your fire. Depending on your smoker/cooker, you may need to adjust your exhaust vent open or closed. Once you find the optimized opening of your vent, you shouldn’t need to make any more adjustments.
3. If you have a large smoker and you find one Billows fan is not enough to hold temperatures steady, a Billows Expansion Kit can be purchased which will allow you to add another Billows fan to your set up.
Alarms
In fan mode, Smoke X automatically sets High and Low alarms at ±25°F of the Set Temp. These are calculated on the hardware. They cannot be adjusted in fan mode. For example, if your Set Temp is 225°F, your Low alarm will automatically be set to 200°F, and your High alarm will automatically be set to 250°F.
If the Low alarm sounds, check to see if you need to optimize your exhaust vent or if the smoker/cooker is running out of fuel.
If the High alarm is triggered, adjust the exhaust vent to a more closed position or ensure all other inlet vents are closed.
Turn Alarms Off or On
1. Press the CH button until Channel 2 (Smoke X2) or Channel 4 (Smoke X4) flashes then press SET. Alarm On should begin to flash.
2. Use the Up and Down arrows to adjust the alarm on or off.
3. Once you have selected on or off, press SET to save your selection