Top
This Help File contains instructions for the topics below.
Before You Begin
- ThermoWorks App Installation
- Important to Know
- ThermoWorks App vs ThermoWorks Cloud
- ThermoWorks App vs ThermoWorks Cloud: Important to Remember
- How many devices can be attached to the app?
- Type of Device Connections and Range Limits
- Device Communication Between ThermoWorks App and ThermoWorks Cloud
Adding Your Device to the App
Using ThermoWorks App
- Devices in ThermoWorks App
- Devices List
- Accessing and Modifying Device Settings
- Channel Settings
- Accessing and Modifying Channel Settings
- Alarm Colors
- Sessions and Graphs
- Important to Know about Sessions
- Sessions Options
- Adding or Editing Session Notes
- Important to Know about Graphs
- Viewing Graphs
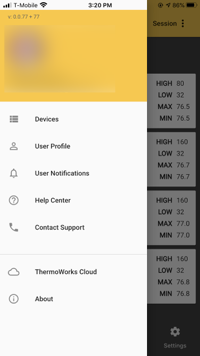
- User Profile
- Edit User Name
- Set Preferred Units (F° or C°)
- Set Clock as 12 or 24 hours
- View ThermoWorks’ Privacy Policy
- Logout
- ThermoWorks Cloud
- Access ThermoWorks Cloud Mobile Website Through App
Troubleshooting Your Device
A
ThermoWorks App Installation
You can manage your devices (BlueDOT, NODE, Signals, Smoke Gateway, ThermaQ WiFi, ThermaData WiFi, and ThermaQ Blue) in the ThermoWorks app.

Download the free ThermoWorks app from either the iTunes App Store or the Google Play Store. Open the app on your smart device to begin.
Note: If you were using the older ThermoWorks BBQ app, we recommend that you either delete it from your smart device, or log out of the account. Otherwise, you will receive double notifications while using the ThermoWorks app.
When you begin using the ThermoWorks app, you will be prompted to login. The options are:
- Use your Google login.
- Use your Apple ID login.
- Use an email address to log in. If you choose this option, you will be required to set up an account before you can log in.
- To create an account, use the Create an Account link, found on the login screen.
- The password must contain at least 8 characters, one uppercase letter, one lowercase letter, and a number.
- Anonymous login. Note: If you choose this option, you may only access current, live data in the app. It will not save on either your smart device or to ThermoWorks Cloud.
Note: Your ThermoWorks app account is not connected to your ThermoWorks store account or the previous ThermoWorks BBQ app account.
Back to Top
B
Important to Know
ThermoWorks App vs ThermoWorks Cloud
The ThermoWorks app is installed on your smart device and allows you to do the following:
- Add, view, and manage devices
- View and manage channels
- Graph cooks
- Create and manage sessions (or archives)
- Add or edit session notes
- Manage your user profile
- Manage smart device notifications
- Access ThermoWorks’ Tech Support contact information
- Access ThermoWorks Cloud
Note: Anonymous app login users do not have a ThermoWorks Cloud account.
ThermoWorks Cloud is a cloud-based archive and device management tool. You may access ThermoWorks Cloud via the ThermoWorks app or in a browser at https://cloud.thermoworks.com. See the ThermoWorks Cloud Help file for specific instructions.
Note: Anonymous app login users do not have access to ThermoWorks Cloud.
ThermoWorks Cloud allows you to do the following:
- Devices and Channels
- View and manage devices
- Assign and add devices to a location
- View and manage channels
- Graphs, Sessions, and Archives
- View detailed active graphs
- Archive the current graph
- Create, view, and manage sessions and archives
- Add or edit session notes
- Export data (Excel 2007+ or .csv file)
- Save the dashboard graph as image
- Clear all readings from ThermoWorks Cloud
- User Profile
- Modify a user’s details (Name, Preferred Units (F° or C°), Set Clock as 12 or 24 hours)
- Edit user notification settings
- Account Settings
- Add or manage users
- Add locations
- Add devices
- Manage account notifications
- Billing (Note: Billing tiers are available for users with various data requirements. See the ThermoWorks Cloud Help file for more details.
- Delete your account
- Edit the account name
- Note: Additional features are available for data logger users. See the ThermoWorks Cloud Help File for more information.
ThermoWorks App vs ThermoWorks Cloud: Important to Remember
- If you log in to the ThermoWorks app via an Anonymous login, you do not have a ThermoWorks Cloud account.
- While you may access and manage all your sessions and the current graph in the ThermoWorks app, all graphing and session data is automatically saved to ThermoWorks Cloud rather than to your smart device.
- Archived data is only available to view in ThermoWorks Cloud.
- Accessing your data via ThermoWorks Cloud gives you access to many additional features not available in the ThermoWorks app.
- You may manage most device settings in both the ThermoWorks app and in ThermoWorks Cloud.
- While you may set up and change Smoke Gateway alerts, app alarms, graphs, and sessions in both the ThermoWorks app and ThermoWorks Cloud, you may not change Smoke’s hardware settings in the app or ThermoWorks Cloud as Smoke + Smoke Gateway includes one-way communication. Two-way communication is required to change hardware alarms and channel settings from the app or ThermoWorks Cloud.
How Many Devices May Connect to the ThermoWorks App at Once?
- ThermoWorks app is used with BlueDOT, NODE, Signals, Smoke Gateway, ThermaQ WiFi, ThermaData WiFi, and ThermaQ Blue and can be used with all types of thermometers at once.
- *Typically, your smart device can support up to 6 Bluetooth-connected devices at the same time.
- You may track an unlimited number of Smoke Gateways at the same time.
- You may track an unlimited number of Smoke Gateways while tracking up to *6 Bluetooth-connected devices (BlueDOT and Signals).
- If using a Wi-Fi connection with Signals, you may track an unlimited number of Signals at once.
- If using a Wi-Fi connection with Signals, you may track an unlimited number of Signals, Smoke Gateways, and up to *6 BlueDOTs at the same time.
Type of Device Connections and Range Limits
NODE, Signals, Smoke Gateway, ThermaQ WiFi, and ThermaData WiFi use a 2.4GHz Wi-Fi network.
Smoke will communicate with Smoke Gateway up to 300 feet line-of-sight.
Signals, BlueDOT and ThermaQ Blue will communicate via Bluetooth up to 95-feet line-of-sight, unless other factors are involved.
- Devices that use 2.4GHz radio frequencies (microwave ovens, cordless phones, remote controls, etc.) may create interference.
- The signal may be interrupted by walls and building materials, such as tinting on windows.
WiFi devices will help you stay connected anywhere in the world through the ThermoWorks app or ThermoWorks Cloud as long as the following is true:
- WiFi devices have been setup on a 2.4GHz Wi-Fi network with an internet connection.
- Your smart device has an internet connection to receive the data (Wi-Fi or cellular).
Device Communication Between the ThermoWorks App and ThermoWorks Cloud
Most devices include two-way communication, meaning that changes made in the ThermoWorks app and ThermoWorks Cloud are reflected on the hardware and changes made on the hardware are reflected both in the app and ThermoWorks Cloud. (Changes will reflect between the two based on the set interval rate.)
There is one-way communication between Smoke Gateway and the ThermoWorks app and ThermoWorks Cloud, meaning that the app receives temperature data from Smoke via Smoke Gateway, allowing you to track the cook remotely; you cannot change the settings of Smoke’s hardware from within the ThermoWorks app or ThermoWorks Cloud. Your smart device will alert you when the channel’s temperature limits you have set in the app have been reached.
BlueDOT temperatures can be viewed anywhere in the world as long as the following is true:
- BlueDOT is connected to a proximate smart device with an internet connection. This smart device must remain within range of BlueDOT, as the smart device will function as a gateway.
- A second smart device logged into the same account has internet connection.
Back to Top
Adding Your Device
C
Setting Up BlueDOT
Before you begin, make sure that…
- You have installed the latest version of the ThermoWorks app on your smart device.
- Bluetooth is enabled on your smart device.
- Your smart device is within Bluetooth range of your BlueDOT, which is 95 feet or less, depending on obstructions or interference between your smart device and BlueDOT.
- Location services are enabled on your smart device (found in your smart device’s settings).
- Power on BlueDOT.
In the ThermoWorks App
- From the Menu, choose Devices.
- Click on the + Device button.
- Select BlueDOT from the popup menu.
- After scanning, a list of available BlueDOTs will appear. Choose the BlueDOT you wish to connect to.
- Once connected, your BlueDOT is ready to use.
Note: To use BlueDOT with ThermoWorks Cloud, it must have dedicated smart device with an internet connection.
Troubleshooting: BlueDOT Help File
Back to Top
____________
D
Setting Up Signals
Before you begin, make sure that…
- You have installed the latest version of the ThermoWorks app on your smart device.
- Bluetooth is enabled on your smart device.
- Location Services are enabled (found in your smart devices’s settings).
- Your smart device is within Bluetooth range of Signals, which is 95 feet or less, depending on obstructions or interference between your smart device and Signals.
- Signals is close enough to your Wi-Fi router to get a reliable connection during the Wi-Fi setup portion of the process.
- You know your secure 2.4GHz Wi-Fi network’s name and password, including the correct letter case and punctuation. You may use Signals with an open network.
- The network password is 39 characters or less, if required.
- The network security type is WPA/WPA2 or open.
- You have powered on Signals.
In the ThermoWorks App
- From the Menu, choose Devices.
- Click on the + Device button.
- Select Signals from the popup menu.
- After scanning, a list of available Signals will appear. Choose the Signals you wish to connect to.
- After the Bluetooth connection is made, a Setup Network Info dialogue will appear. Click → Continue.
- Enter your 2.4 GHz network’s name and password. Leave the password field empty if using an open network.
- After the network connection is established, Signals is ready to use.
Troubleshooting: Signals Help File
Back to Top
____________
E
Setting Up Smoke Gateway
Before you begin, make sure that…
- Your Smoke Gateway is fully charged.
- You have installed the latest version of the ThermoWorks app on your smart device.
- Your Smoke Gateway is within 300 feet line-of-sight of your Smoke (depending on obstructions or interference between Smoke and Smoke Gateway) and close enough to your Wi-Fi router to get a reliable connection.
- You know your secure 2.4GHz Wi-Fi network’s name and password, including the correct letter case and punctuation. You may use Smoke Gateway with an open network.
- The network password is 39 characters or less, if required.
- The network security type is WPA/WPA2 or open.
- Location services are enabled on your smart device (found in your smart device’s settings).
Note: You may need to update Smoke Gateway’s firmware before beginning the setup process. Instructions for updating the firmware are found here.
In the ThermoWorks App
- From the Menu, choose Devices.
- Click on the + Device button.
- Select Smoke Gateway from the popup menu.
- Follow the in-app instructions to sync Smoke and Smoke Gateway.
- After the network connection is established, Smoke Gateway is ready to use.
Notes: If you are interrupted during the setup process and find that you cannot continue through the steps, begin the setup process again.
Troubleshooting: Smoke Gateway Help File
Back to Top
F
Devices in ThermoWorks App
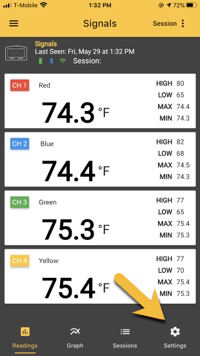
Devices List
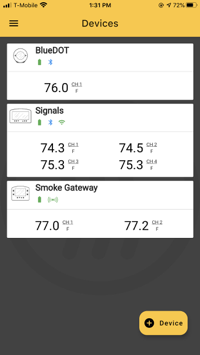
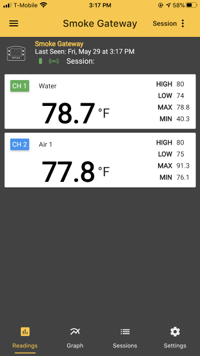
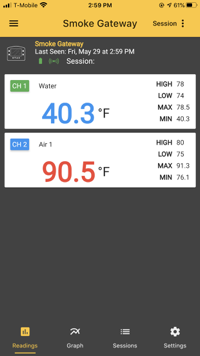
To access or add devices in the app, go to the Devices list at the top of the left-hand menu.

You will see the following information about your attached devices on this page.
- Device type and name
- The battery status
- If the device is connected to Wi-Fi, Bluetooth, or radio frequency
- Current temperatures from the probes attached to each device
- Fan connection
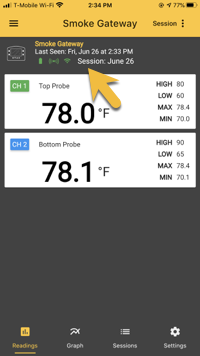
Notice the information found above the channel list. It tells you…
- Device name
- How the device is connected
- The session’s name, if available. (You must name a session to see a name here.)
- When the device was last seen (or connected to the app)
- A battery icon which indicates one of the following statuses: 1. The battery is charging 2. The battery has an adequate charge level 3. the battery needs to be charged or replaced.
- You will receive a push notification alert when the battery’s charge is getting low.
- Check the device’s Settings to see how much battery charge is remaining
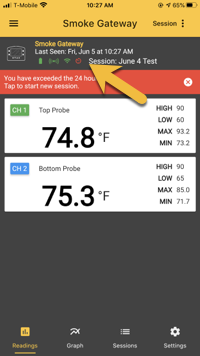
Sessions may last a maximum of 24 hours. Once 24 hours passes, the session automatically ends and you will see the red session limit warning icon appear on the icon list. Additionally, you will see a red warning message appear above the channel list.
Note: If you are using an Anonymous login, session functionality is not available to you. However, you can clear your graph data.
Accessing and Modifying Device Settings
From the Devices listing, click on the device you wish to edit.
Next, choose the Settings gear icon.
Each type of device has a different set of options in the Device Settings, as shown below.
BlueDOT
- Device ID
- Device Name
- Battery Level
- Min Max
- Display Units (Switch between Fahrenheit and Celsius)
- Interval Rate (This is how often BlueDOT sends a reading to the ThermoWorks app.)
- Bluetooth Connection Information
- Remove Device from Account
Signals
- Device ID
- Device Name
- Battery Level
- Min Max
- Display Units (Switch between Fahrenheit and Celsius)
- Interval Rate (This is how often Signals sends a reading to the ThermoWorks app.)
- Bluetooth Connection Information
- Wi-Fi Connection Information
- Firmware Version and update
- Remove Device from Account
Smoke Gateway
- Device ID
- Device Name
- Battery Level
- Min Max
- Wi-Fi Connection Information
- Remove Device from Account
Back to Top
G
Channel Settings in the ThermoWorks App
Accessing and Modifying Channel Settings
Note: While you may set up and manipulate Smoke Gateway alerts, app alarms, graphs, and sessions in the ThermoWorks app, you may not change Smoke’s hardware settings from the app as Smoke + Smoke Gateway includes one-way communication. Two-way communication is required to change hardware settings from the app.
BlueDOT and Signals users may edit hardware settings in the app as they include two-way communication.
Click on the device you want to work with from the Devices listing.
An attached channel overview will appear. Choose the channel you wish to edit by clicking on it.
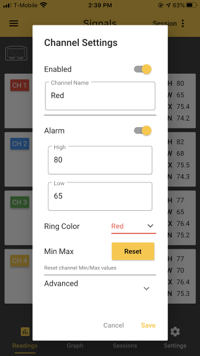
Use the Channel Settings dialogue to edit the following:
- Enable or disable the channel
- Name the channel (Note: If using Signals, the first 4 digits of the name will also appear on the hardware’s display.)
- Enable or disable alarms
- Set high and low alarms
- Set the probe ring color
- Reset Min Max history
- Advanced: Change the channel’s calibration trim adjustment (BlueDOT and Signals only)
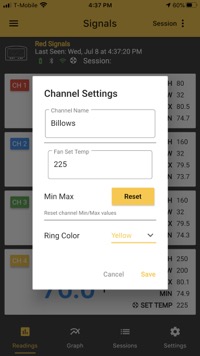
If you are using Billows with Signals, use the Channel Settings dialogue to edit the following:
- Name the channel
- Enter the fan set temperature (Note: Alarms will automatically be set 25° above and 25° below the set temperature.)
- Reset Min Max
- Set the probe ring color
Alarm Colors
When the current temperature’s numbers are black, the temperature reading is within the set limits.
When the temperature is blue, the low temperature limit has been exceeded. When temperature is red, the high temperature limit has been exceeded. When the temperature is gray, the app is updating with the most current readings.
Billows
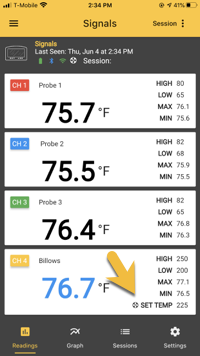
When Billows is attached to Signals, you will see a fan icon next to SET TEMP. In this example, the channel has also been named Billows. You may name the channel whatever you’d like.
Back to Top
H
Sessions and Graphs in the ThermoWorks App
Sessions
Important to Know about Sessions
- Sessions functionality is not available to Anonymous login users.
- Sessions allow you to archive graphs along with any notes you add about the cook/graph via session notes.
- All session archives are located in ThermoWorks Cloud; they are not saved on your smart device.
- Device sessions may last up to 24 hours.
- You may save an unlimited number of sessions.
- Starting a new session clears and resets the graph.
- We recommend that you start a new session each time you begin a new cook so its graph will begin and end when you wish it to.
- You may delete sessions through ThermoWorks Cloud.
Sessions Options
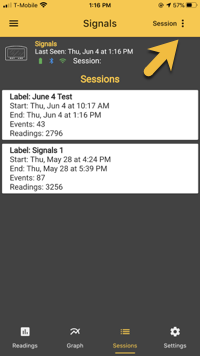
After choosing the device you wish to work with, select the Sessions Options dialogue through top right-hand corner menu.
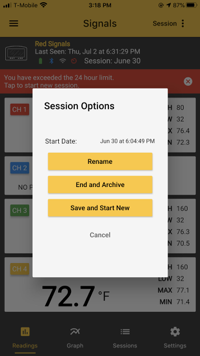
Use the Session Options dialogue to rename the current session, end and archive the current session, or save and start a new session.
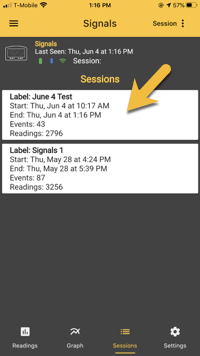
To easily access a particular session’s archive, click on its label in the Sessions list and you will be taken to its record in ThermoWorks Cloud. From there, you will be able to:
- View the session’s graph
- Manage the session and its archive
- Add or edit session notes
- Export the data to a Excel 2007+ or .csv file
- Save the graph as a .pdf, png, or .jpg image
Adding Session Notes
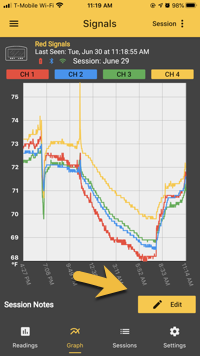
To add or edit notes about your graph or session, choose Graph from the bottom menu. Click the Edit button.
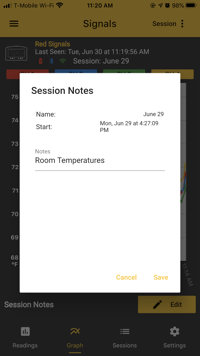
Edit and Save. The notes will automatically be synched to ThermoWorks Cloud.
Note: You can add or edit session notes in both the ThermoWorks app or ThermoWorks Cloud.
Graphs
Important to Know about Graphs
- Anonymous login users may not save or archive graphs.
- A session’s graph begins at the point in which you started the session and stops when either 24 hours have passed or you manually end the session.
- In order to archive a session graph that starts when you want it to, you must click End and Archive or Save and Start New.
- All archived graphs are located in ThermoWorks Cloud; they are not saved on your smart device.
Viewing and Working With Graphs in the ThermoWorks App
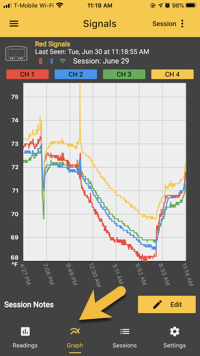
View the active graph by selecting the Graph tab, located along the bottom edge of the app. The graph will automatically update each time new data is sent to the app. How often new data is sent is dependent upon the Interval Rate you have chosen (located in your device’s Settings).
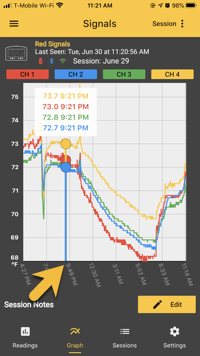
Drag your finger along the graph to see the exact time and temperature.

Missing or non-working probes or sensors result in missing information. In this example, Channel 1’s probe (red) was removed from Signals.
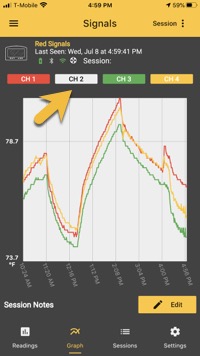
Use the channel button at the top of the graph to hide the channel from the graph.
Q
Troubleshooting
Check these articles to find additional help with your particular thermometer.